TRX Studio Line Dimensions Installation | Bridges Suspension Storage Bays T-Unit Corner Units
Create the ultimate functional training zone in your facility. These highly customizable suspension anchoring and storage systems maximize space efficiency and exercise functionality, while emphasizing design and aesthetics to suit the needs of each unique member, space and activity.
Activate Any Space With TRX Studio Line:
Activate group studios, dynamic training areas, flexibility zones, or anywhere you need a little extra organization and functional training support. All units include optional mounted TV and/or self-guided exercise branding options for: mobility, functional training, upper body, lower body, and core.
TRX Studio Line Bridge Solutions:
- Customizable storage and functional training configurations.
- Single Bridges – Double Bridges
- Easily change configurations based on needs
- Optional heights 7′ Standard 10′ Elevated
- Single Bridge Length Options 14′ – 21′ – 28′

TRX Studio Line Bridge Anchor Points:
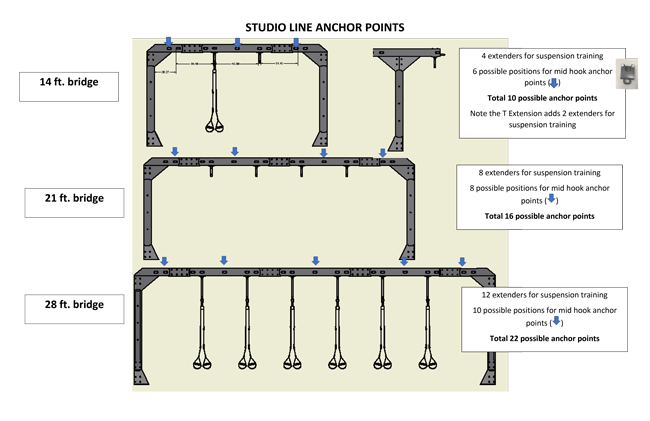
TRX Studio Line Bridge Dimensions:

TRX Training Zone:
Upper Body Workouts – Core Workouts – Lower Body Workouts – Mobility Workouts – Functional Training Workouts.

TRX Suspension Bays & Corner Unit Solutions
- Customizable storage and functional training configurations.
- Easily change configurations based on needs
- Optional heights
- Single Suspension Bays – Double Suspension Bays – Triple Suspension Bays – Add on Suspension Bays
- Supports 2 suspension trainers per unit

TRX Suspension Bay Dimensions:


TRX Corner Unit Dimensions:

- Customizable storage and functional training configurations.
- Easily change configurations based on needs
- Bi-Directional system is floor mounted, permitting a freestanding configuration and 360-degree training zone.
- Supports up to 6 suspesion trainers

TRX Studion Line T-Unit Dimensions:

TRX Studio Line Accessories – Attachments:
Many attachments associated with the TRX Studio Line. Some of the more Standard Attachments are as follows:
- TRX Shelves
- TRX Stability Ball Shelves
- TRX Drawers
- TRX Step Up & Dip Bar
- TRX Dumbmell Holder
- AND MORE!
TRX Step Up & Dip Bar Dimensions:

TRX Studio Line Standard Shelf Dimensions:

TRX Studio Line Drawer Dimensions:

TRX Studio Line Pre-Install Guide Quick Reference:
Configurations must be anchored directly to structurally sufficient concrete floors to ensure maximum safety and frame rigidity. Failure to secure it to the floor could result in toppling, leading to serious injury. Failure to secure it to the floor will also allow it to walk or rock while in use. This type of movement is unsafe and could damage the floor surface.
TIPS:
- Your floors must be concrete (3,000 psi or greater) internally threaded drop-in anchor ( 1/2 13 thread), Grade 5 or higher. Minimum install depth: 2″
- Any surfacing/material that resides above the concrete and thickness of that material will need to be cut away professionally by the installer or alternatively, Studio Line can be installed prior to any flooring/turf, carpet, etc.
- Confirm if your concrete slab is post-tensioned (Post-tensioned slabs have steel rods running through them to strengthen the concrete)
- Make sure that you have noted on the site survey if there are any special requirements for us to be aware of (i.e. loading dock, parking restrictions, freight elevator, etc)
TRX Studio Line Complete Installation Guide Available for download HERE
TRX Studio Line Wall Mount Installation:
TRX TRAINING ZONE® STUDIO LINE configurations must be anchored directly to structurally sufficient concrete floors or walls (3,000 psi or greater compressive strength) to ensure maximum safety and frame rigidity and eliminate rocking and tipping over. Wall mounting fasteners are not included and must have a minimum of 500lbs. tensile capacity, be a bolt grade of 5 or better and installed per the bolt manufacturer’s specifications. Use seismically rated sleeves as deemed necessary by the facility.
APPROVED WALL ANCHORING APPLICATIONS:
- Concrete Wall: Drop-in anchors, 3/8 – 16 thread size; min. length 1 ½”, Grade 5 or higher
- Concrete “Block” Wall: Internally threaded toggle anchors 3/8 – 16 thread size, Grade 5 or higher
- Wood Stud or Blocking Wall: 3/8” x 3” Lag screws, Grade 5 or higher
WARNING:
Only licensed contractors or certified installers should be used to insure proper anchoring, installation, and compliance with local building codes.
Due to the wide variety of flooring and wall construction on which equipment may be anchored or installed, and differences in applicable local building codes, Fitness Anywhere LLC (dba TRX Training) is not responsible for any damage to flooring or walls that may result due to anchoring or installing equipment or for compliance with local building codes.
Warning labels, shown below, MUST be applied to both ends of a Bridge or multiple Bay system during the installation process. Placement on Foot Cover is recommended. It is critical that owners maintain the integrity and placement of these stickers.
Assembly Steps:
1. Assemble Bay/Bridge end, keeping ladder bolts hand tight.
2. Drill holes for wall mounts corresponding with height of the top and bottom bolts of each ladder. Two (2) wall mounts must be installed on each post of a Bridge or Bay system. Wall mounts MUST be installed into wall studs.
3. Move the Bay into place and bolt through the wall mount, vertical post, and ladder. Wall mounts should be bolted over washer plate on either ends of a multiple Bay system.
4. Tighten all bolts.